
Techniques
- Imaging with the ETX70 and SAC7 CCD Camera
Background:
The
ETX70, SAC7 CCD Camera, AstroVideo, and Picture Window
Pro combine to for a very low cost and easy to use set of
tools capable of producing some nice astro-images. When I
purchased the equipment new, this setup of telescope
(OTA, goto mount and tripod), camera, and software, cost
me less than $800 total. I do the majority of my imaging
from my suburban back yard in central Massachusetts.
Imaging with an ETX70 and SAC7 camera is -really- fun.
It's also a very easy and relatively inexpensive way to
get started in imaging. I highly recommend the
combination.
The key
characteristics of the ETX70:
- Large field of view
- Fast focal ratio (F/5)
- Goto mount
- Very light
- Small aperture
- Limited magnification
The Meade Autostar does a very nice job finding and
tracking targets. The equipment is very light, telescope,
camera and eyepieces can all be brought out in a single
trip, on a moments notice. I use the telescope aligned in
AltAz mode to make setup quick and easy.
Because of the big field of view and small aperture, the
70 is particularly good for large, relatively bright deep
sky objects. The fast focal ratio makes imaging these
objects easier by keeping exposure time requirements
down. Although capable, the telescope isn't quite as good
for Solar System objects and planetary nebulae, as they
typically call for more magnification than it can
deliver.
The key
characteristics of the SAC7 camera:
- It is a color camera
- Supports extended exposures
- Supports .AVI movie format
- Has a small pixel size (5.6 microns)
- Has a small chip area (3.6mm x 2.7mm)
The SAC7 is a nice, rugged, low end color camera. The
camera is controlled with the supplied AstroVideo
software from COAA. AstroVideo is integration software,
enabling the addition of multiple frames to create a
final image. It is easy to use and can control all
functions of the camera. Planets, Moon and Sun can be
imaged by taking .AVI movies and from one to hundreds of
long exposure stills can be taken for imaging deep sky
targets.
The ETX70
and the SAC7 together:
When used on the ETX70, the field of view of the SAC7 is
26.53 arcminutes high X 35.37 arcminutes wide. This means
that the field of view is fairly large (larger in width
and only slightly smaller in height than a full moon).
The image scale of this combination is about 3.3 arcsec
per pixel which is forgiving. The scope and mount can
bump/shake/vibrate or otherwise miss by up to 3.3
arseconds without having light cross over onto an
adjacent pixel.
Imaging Deep
Sky Objects:
Getting good deep sky images takes time both in the field
as well as at the computer during image processing.
Seeing a faint nebula or other object slowly come into
view when adding images together is exciting and
rewarding. This is -not- an uncommon experience when
summing lots of short exposure images! Success is
dependent on finding and centering the object in the
camera's field of view, and on taking the following
steps:
* Focus
carefully
When acquiring the images, one of the most important
factors is having good focus. Having an eyepiece that is
near par-focal with the camera is a big help. Adding
par-focalizing rings to eyepieces works if you don't have
any eyepieces that match the focal point of the camera. I
have found that one ring on a 12mm eyepiece gets you
pretty close. Alternatively, you can count the number and
direction of focus rotations going back and forth between
the camera and a favorite eyepiece to get you close. In
either case, final fine-tuning of the focus is critical
to getting a good final image and is worth spending time
on up front.
* Get
steady exposures
I've tried various exposure lengths, and have had the
best luck with 8-12 seconds. Taking 100 exposures of 10
seconds each, I routinely keep over 90 images, with a
loss of less than 10% to shakes and trails. The
"keeper" rate decreases sharply after about 15
seconds of exposure. Final images are much better if only
clear, tight images are used. The drawback however, is
that shorter exposures tend to have less detail. In other
words, you usually can't "go deep" into image
detail with short exposure lengths.
* Gather
lot's of data (exposure time)
It's very important to gather as much clear, sharp
exposure time as possible. I usually stick to a very
limited number of subjects per night, and take lots of
images of them for this reason. Good images are summed
together, adding their light together into a clear
exposure much longer than the mount would ordinarily be
capable of. Since only quality images should be used,
maximizing their quantity is important.
* Always
take dark frames
At least with my camera, extended exposure images have
too many hot pixels to be used without dark frames
subtracted. I always take a set of dark frames at the end
of each session. It's important to keep the camera
contrast and gain control settings unchanged for the dark
frames. In other words, these settings should be
-exactly- the same for both the images and the dark
frames. Failure to take a good set of dark frames usually
results in a set of very noisy images.
* Apply
the dark frame subtraction
Always perform the dark frame subtraction -before-
summing the images. I usually sum 5 dark frames together
and scale the subtraction at 0.2 in AstroVideo.
Occasionally, if background noise is very high, I will
use 10 frames scaled at 0.1 but as the number of frames
increase, and the scale decreases, the chance for
"cold" pixels (black spots) increases. Cold
pixels are as bad as hot pixels and need to be avoided.
* Rough
sum the images
When you are ready to combine the (already dark
subtracted) images from an imaging session, it helps to
roughly combine sets of images that can be more finely
processed later. When dealing with sometimes hundreds of
images, it takes too long to carefully align each one.
AstroVideo has a nice manual sum routine that lets you
add multiple images together. I usually sum about 90-120
seconds worth of images together (usually 10-20 images).
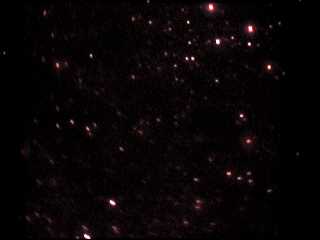
Any longer and the effects of field rotation wreak havoc
on your star fields as shown in this example. This star
field image was summed using 60 raw 10 second images and
registered in AstroVideo using a single point near the
top right portion of the image. Note that the field
rotation effect worsens as you move further from the
registration point.
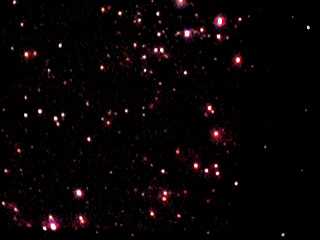
* Perform
a refined sum
After creating the rough sums, convert them from FITS to
BMP format for further processing. Assuming an exposure
time of 10 seconds, and 200 total frames, there should be
about 10 images of 20 frames each to process. I use the
Picture Window "two point shift, rotate and
scale" option to register and add images together.
Using image processing software to carefully register the
images eliminates most of the field rotation that is seen
when just using a one point registration as with
AstroVideo. Here's the same star field, created using
exactly the same raw images as in the example above, but
registered using the rough sum then refined sum technique
just described.
* Process
the final image
I usually find that most good images don't require much
processing, although it's sometimes hard to keep from
over-tweaking. A good rule of thumb is to make small
processing changes that can be backed out using undo if
necessary. It is also a good idea to save different
versions of your work under different names or version
numbers so you can always go back to a known good point
if you really make a mess of things.
Imaging the
Moon and Sun:
When imaging these bright objects, it's good to take .AVI
movies rather than single exposures. As noted previously,
the Moon almost fits into the field of view. Once the
capture of the .AVI starts, you can (slowly) pan the
telescope around with the Autostar slew keys. Covering
the whole Moon or Sun can be done easily in about 30
seconds.
With both these subjects, brightness is an issue. Of
course, always use a solar filter intended for solar
viewing when working with the Sun. When imaging the moon,
I usually use both red and blue filters at the same
time. This keeps the camera from being saturated by
all the light and helps to improve contrast and pick up
finer detail.
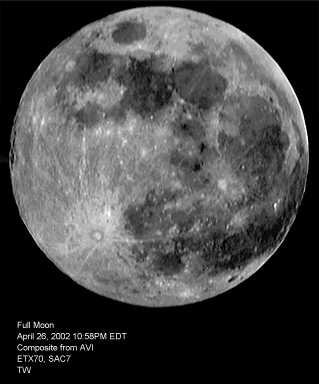
To create a composite image of the moon or sun, I take
the following steps:
*
Establish "view segments"
Edit the .AVI files into smaller segments that represent
a single view of the image. For example, the Moon .AVI
can be broken into 2 segments, one representing North,
one South. To do this I use MGI VideoWave, an application
that I got from another purchase. There are utilities
available from multiple sources to perform this function.
* Average
lots of frames together
The individual .AVI frames can be averaged together into
a final image, greatly improving the signal to noise
ratio. I use Robert J. Stekelenburg's fabulous AstroStack
freeware on the internet
(http://utopia.knoware.nl/users/rjstek/english/software/)
to perform this function, but again there are other
alternatives available if needed. At this stage one might
apply an unsharp mask to bring out additional details in
the final images.
* Create
the composite
The final step is to merge the image pieces together (2
of them in the case of the full moon) to create a final
composite image. If the images are not aligned properly,
the seam connecting the images will be visible. Picture
Window Pro is particularly good at registering and
merging images. Can you see the seam in this full moon
composite?
Imaging the
planets:
Imaging the planets is similar to imaging the Sun and
Moon in that you capture the data with .AVI files and
then process them into a final image. I typically don't
use filters when imaging the planets, I use barlow lenses
to get the magnification as high as seeing and the
telescope will permit. With a 3x barlow in place, the
SAC7 gets to about 105X which is pushing the little ETX70
to it's limit.
I have never been able to get more than a couple of
weather bands visible when using the ETX70. I have tried
and failed to pick up the great red spot, and shadows of
Jupiter's moons. This telescope really doesn't support
the amount of magnification you need when imaging
planets. It's the 70's wonderful field of view that makes
up for it's magnification limitations. There are always
plenty of trade-offs to be considered in astromony!
To create a final image of a planet, I take these steps:
* Identify
the best AVI frames
A key to producing a good planetary image is to use only
those frames that represent the very best moments of
seeing during the capture. I'll usually examine about 100
frames and select from between 10 and 20 frames to use in
producing the final image. I use the handy Avi2Bmp
utility to select the frames and create .BMP files out of
them. This software can be downloaded without charge from
http://avi2bmp.free.fr/telechar.htm
* Average
lots of frames together
The selected best frames (.BMP files) can be averaged
together into a final image, greatly improving the signal
to noise ratio. Again, I use AstroStack for this type of
work. Unsharp masking can also be applied at this stage
to help to bring out details, but if used too heavily,
can wreck the image.
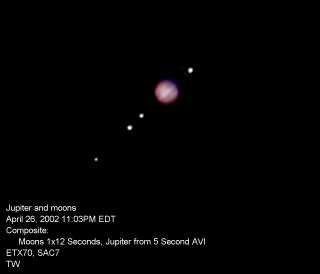
* Perform
final image processing
Final image tweaking, such as sharpening and adjusting
the contrast and brightness curves, has a big impact on
the final image. As noted, I use Picture Window Pro for
this. The image of Jupiter and moons above was created by
making a composite using an extended exposure to capture
Jupiter's moons, and an AVI to image the planet itself.
<< back